Showing posts with label bamboo rod. Show all posts

05 May 2013

My new rod making project

I have started my new rod making project.  


I am thinking to make another 4 weight rod with a very different taper from other 4 weights that I already have.  This will give me more info on how tapers work in terms of casting.

I can also go 180 degree to make a 6 weight switch rod to cast bigger flies from surf. There are many beautiful beaches along the southern coast of WA, and I love to chase Kahawai on those places.


22 December 2010

Prep for NZ


I haven't able to go fishing for nearly three weekends because of
the end of year school stuff (which is always hectic) as well as all prep work for our trip to NZ.

I am still working on a spare tip for my bamboo rod which I will take to NZ, and it looks like I might be just able to finish it before we leave on Saturday.

There is still a lot of spaces in my fly boxes which should be filled with flies by now, and I do my best to tie some more. I can do the rest when I get there, I guess.


Got a new pair of shoes and a new mat for NZ

17 June 2009

Rod test for bream #2


I finally had a chance to test my bamboo rod on breams.

I know a 4 weight graphite rod can handle breams including some large ones. That is a story for graphite.

I have been wonderling if 4 weight bamboo is as strong as graphite when it comes down to landing breams which fight much harder than trout of the same size do.


I hooked up a few small to medium size breams today, and the rod was handling the fish well. It feels to me a bamboo rod is much stronger than I thought.

先週末に続いて、バンブーロッドでクロダイ釣りです。釣る前は#4の細いティップが心配でしたが、近所で釣れる平均サイズの魚なら#4でも平気そうです。竹竿は思ったより丈夫みたいです。


Pentax Optio WPi

13 May 2009

New rod


I have just completed my new rod. It is 6' 6" long and designed for 4 weight line.

Instead of using one from already existing tapers, I played around stress-curves on a computer to determine the taper I want this time.

It was a guess work but it turned out to be very good.
I took the rod to a park this afternoon to have a short casting session, and I am very pleased with the rod action so far.

I will ask my friends to cast the rod on the weekend, and I will write more about its casting feel then.


シーズン最後の日には間に合いませんでしたが、新しい竿が完成です。6フィート半の4番です。


15 March 2009

New reel seats


Personally the best reel seats are ones made of cork. They are simple, light, and functional.

However, the good cork rings are rare and quite expensive. A decent ring costs about A$ 3 to 4, and I need about 7of those to make up for one reel seat.

I bought a bag of 100 cork rings, and I got some nice ones, but I would rather save good cork rings for grips.

At the end of the day, I can still get a nice reel seat made of wood but I haven't seen a good rod grip made of wood. The rod grips have to be made of cork rings, and they have to be good ones.


Anyway, I ordered a pair or reel seats a few weeks ago, and they have just arrived.

One at top is made by Struble and another is from Bellinger.

I like both but I am not a fun of heavily varnished wood spacer of Struble. So I will scrape off varnish and put some oil instead.

Looks to me, Bellinger has changed their design for their metal parts. The new one looks different from the one I used on my first rod. I prefer the look of the older one but the new one is a lot lighter.

オーダーしてあったリールシートが届きました。

上のがStruble社製、下がBellinger社製です。Bellingerのはメタルの部分のデザインが変わってしまったようで残念ですが、前のよりも大分軽くなっています。

Struble社製のはニスでテカテカしていますが、僕はニスのテカリが嫌いなので削り落としてオイルフィニッシュに変更します。


26 October 2008

Afternoon casting session


We had another casting test yesterday. Rio Gold line, which Chris asked me to try, feels very nice with the new rod.

友達が「作った竹竿に試してみな」と新品のRioのGold Lineをくれました。太っ腹です。 ラインが乗るに従ってバットがしなるセミ・パラボリックのアクションに合わせると、”Slingshot action"と言われるパワーのあるループでラインが飛んで行きます。

繊細さが売りのXPSが好きなんですが、この竿にはGold Lineの方が合っているようです。


I quite like the way this plastic reel looks on a bamboo rod. I might get one when I make a new bamboo rod for bream fishing on flats.

Loopのプラスチック製のリール。友達が「バンブーロッドにお似合い」と言うので竹竿に着けてみましたが、うーん、なかなか良いと思います。クロダイ用に竿を作ったら買おうかなあ。


EF 24mm f/2.8

19 October 2008

Another fishing afternoon

As I get used to the feel of a bamboo rod, it becomes much more comfortable and enjoyable to cast and fish with.

I now get less trouble with overhanging branches with my short rod which is another good thing.


「竹竿は性能の悪さを、愛情とか味とか言って我慢する物だろう」と作る前は思っていましたが、実際に使ってみると今まで使っていたカーボン竿よりも良い感じです。「竹とカーボンどっちが優れているか」と言う話がありますが、竹でもカーボンでも良い竿は良いし、悪い竿は、竹だろうとカーボンだろうとダメだと思います。

でもやっぱり竹竿のフィーリングは気持ち良いです。


EF 24mm f/2.8


EF 50mm f/2.5 Macro

07 October 2008

Bamboo Rod Field Test

I took out my bamboo rod for the first fishing session.

Casting feel was good, and it was a wonderful feeling to catch trout on a rod that I made by myself.

It is a short rod, and I thought landing fish was bit tricky because of that. I think I need more time to get to used to the new rod.


Anyway, I caught 3 rainbows, and lost 2 at the end. It was a fun day.


今日、バンブーロッドを釣りに連れて行きました。

結果から言うと、3匹釣れて、2匹バラしです。竿の横に魚を寝かせたショットを撮りたかったのですが、牧場を流れる川なんでバンクは砂と泥。新しい竿を泥の上に置くのは嫌だったので、仕方なしに味の無い写真しか撮れませんでした。

6フィートちょっとのショートロッドを使うのは初めてだったので、色々と戸惑う事もありましたが、竿の調子は良い感じです。リーダーキャストやラインを1ー2m位しか出さない様な極端なショートキャストは苦手なようですが、ラインが4mを越えれば扱い易いです。

#4ラインの竿ですが小さいドライフライよりも#12位の大きめのドライで釣り上がって行く方がこの竿には向いているのかもしれません。まあ今回は普段使っているDTではなくて、友達から竿テスト用にもらったWFなので、次回はDTでテストしてみます。


04 October 2008

My First Bamboo Rod

It's all done. I now have my first bamboo rod.

The modesty is a Japanese virtue, but I must say, I have done a pretty good job. Sure, I made some mistakes here and there, but at the end, the rod looks beautiful and casts beautifully.

I have asked my friends to do some casting tests, and they are also pleased with the way rod casts line.

The rod is 6' 4" long, and It is really a sweet little rod for 4 weight line (some may prefer to use 3 weight line with it), It feels crisp in my hand, yet the casting action is very smooth throwing a nice tight loop.

I can't wait to catch fish on it.


やっと待望の一本目のバンブーロッドが出来ました。ポール・ヤングのテーパーをベースにした6フィート4インチのショートロッドです。

自分で言うのもなんですが、良い竿になりました。特に、アクションが良いです。 まず、細いティップは返りが速いので、もったり感がありません。

面白いのはバットの部分で、キャストが長くなるにつれて、曲がりが大きくなります。このバットの曲がりを使ってラインを楽に遠くまで飛ばせるのですが、このフィーリングがなんともいえない新感覚。

キャスターの腕の力と速い動きでラインを飛ばすのとは違い、ロッド全体を使って楽にキャストができ、スローアクションのロッドにありがちな緩いループではなく、幅が狭くスピードの速いナローループでラインが飛んで行くのは気持ちがいいです。

この竿で早く魚を釣ってみたいなー


01 October 2008

Gluing a reel seat

I put a reel seat onto the blank today.

It is one made by Bellinger with a stabilized box elder spacer. Although I am not that keen on stabilized wood or burl for reel seats, orange colour of the burl actually looks good with a yellow colour of the blank. So I guess, I made a right choice.

リールシートを接着していよいよロッドの完成です。
使ったのはベリンジャーのボックスエルダーのリールシート。

「いつかバンブーロッドを作ったらこれを付けよう」と思って買ってからもう数年もたちましたが、やっと日の目を見る時が来ました。

正直言って、機能性はコルクのリールシートにスライディングバンドが一番ですが、今回付けたリールシートの黄色っぽい木目の色はストローカラーのブランクに良くお似合いだと思います。

Guide wraps & coating

I have already glued a ferrule on a blank and put a grip on.

The next step is to wrap threads on guides and put coating on them.


My first rod is almost done. I am nearly there.

ガイドとフェルールに絹糸を巻いて、コーティングを塗ります。

ロッドブランクはオイル仕上げにしたのでですが、どうやらウレタン系のニスとは相性が悪い様でウレタンニスは乾いても剥がれてしまいます。なので、コーティングはフレックスコートを使用しました。

バンブーにフレックスコートは似合わないと言う意見もあるそうですが、他に使える塗料がなければしょうがありません。スパーバーニッシュが使えるそうなんですが、僕の周りで売っている店がありませんでした。ウレタンによってはOKな物もあるそうですが、一缶$30もするニスをテスト用に買うのはもったいないのでやめました。ちなみにフレックスコートは近くの釣り具店で$18でした。


07 September 2008

Gluing rod blanks

Gluing is done at last. Thanks to the rod binder, it went easier than I thought.

People say that Garrison-type binders will twist and bend blanks, but my blanks only came out quite straight with minor twists for some reasons.

I took off binding thread this morning, and I have found slight bends at the tip section. I hope this will be easy to fix, and Titebond III will stay together when I apply a bit of heat to fix problems.

仕上げ削りに思っていた以上に手間取っていましたが、やっと昨日ブランクの接着が終わりました。

ギャリソン式バインダーは接着の際に「ブランクがねじれる」とか「曲がる」とか聞いていたので心配でしたが、僕のブランクはバインダーを使って接着した後にティップ部分に少々ねじれと曲がりがある程度でした。

今日は、そのティップの曲がった部分を直す作業です。ブランクを温めて曲げを直しますが、熱でTitebond IIIが剥離しないかが心配です。


29 June 2008

Tonkin Bamboo has arrived


I ordered a bundle of Tonkin cane from
Andy Royer a few months ago. I was told last week that the shipment has arrived, so I went to pick up my bamboo today.

I had to make a choice between organising someone to shift 3.6 m long bamboo poles to my house, and finding a place to store such long stuff without upsetting my wife, or cutting them in half so that they will fit in my car and my shed. I have chosen the second option, so I quickly chop them up with my Japanese saw. The task was easier than I thought. I then spend my Sunday afternoon to cut a check split on each pole.

I now got 10 poles now, and since
I haven't finished my first rod yet, it will take a long time to use them up.

一本目の竹竿がいまだに完成していない身分で、三ヶ月程前にさらに竹を注文したのですが、そのトンキンケーンが今日やってきました。

注文したのは10本。オーストラリアのロッドメーカーやアマチュアの方達が集まっての団体注文と言う事で、コスト的にはかなり安くなりました。一本あたり、日本円にして4500円くらいでしょうか。以前アメリカのとあるお店から買ったときの半額以下です。

ちんたらちんたら、作業を進めている僕ですので、この10本の竹は当分ワークベンチの下に眠ってもらう事になるでしょう。


02 June 2008

Heat Treatment


I restarted my rod making project today after two months of absence.

I still have a problem with my heat gun oven, and this is one reason for me not making much progress.

I got a plan for my oven from Internet, and as far as its description goes, it should work like magic, but in the reality, my oven runs with large temperature variations across the length of the oven. All of my test pieces came out appearing to be half cooked or half over-cooked.

I have been trying to fix problems with some modifications here and there, and it is getting to the level where I can live with, at least for my first rod. So I have finally did heat treatment on my blanks today.

When I put blanks in the oven, the temperature was settling around 175 ˚C at the middle and 160˚C at the top. I cooked the blanks for 11 minutes, and flipped them up side down to cook another 11 minutes.

Blanks now feels springier than before, but I don't see much of changes in terms of the colour of the blanks. I am not sure if this is OK or the blanks are not cooked yet. I thought about putting them back in the oven, but I get feeling that I would over cook them if I did that. So I will leave them as they are, and go to the next step.

未だに、オーブンの調子が今ひとつのため、この2ヶ月程、竿作りをサボっていました。

試行錯誤の結果、オーブンの方がまあまあのレベルに成った事で、今日からまた竿作りを再開です。

熱処理ですが、オーブンの上の方で160度、真ん中で175度、下では178度という温度差がありましたが、22分ほどやってみました(11分でブランクの上下を反転)。

以前テストした時は、オーブンの中の温度差が30度くらいあって、10分位の時点で温度の高い箇所で竹は焼け過ぎになっていました。それなんで、今回はちょっと早い8分のところで一度ブランクをオーブンから出して焦げ目が無いかチェックしたのですが、良さそうなので、さらに3分追加の11分です。

出来上がりですが、以前の様に半分が焼き過ぎという問題は無くなったみたいです。ただブランクの色にあまり変化は無いので、これで焼きが入っているのかどうか良く分かりません。ブランクを手で曲げてみた第一印象では、以前より跳ね返りが強くなっている気がしたので、今回はこれで良しとします(もう一回オーブンに入れたら絶対に焼き過ぎになる感じがします)。

03 February 2008

Rod binder and heat-gun oven


I have finally finished making my rod binder.

I did some test runs, and it seems working OK so far except the thread guide.
I think I need to improve it to be something better than a flat piece of aluminium as the binding thread tends to get snapped off at the guide.


I used two empty spools of old fishing line as the winder for the drive belt / cord.


The rod blank will be supported by aluminium C-channels while it runs through the binder.


I also got a heat-gun oven yesterday.

It is a one of those ovens which looks and works like a chimney. The heat-gun blows down hot air from the top, and the air goes through an outer pipe, then it comes up through an inner pipe where rod blanks are hung vertically.


I didn't build this oven though. I instead asked a local muffler shop to build it for me. I haven't tested the oven yet, and I am hoping it works fine.


The oven has a removable end cap, so I can clean or check inside of the pipes when it is needed.


バインダーがやっと完成です。 試しにちょっとバインディングしてみましたが、まあまあの結果です。 バインディング用の糸がガイドの角にこすれて切れやすい様なので、ガイドをアルミの板から他の物に換える必要があるみたいです。

あと、昨日マフラー屋さんに頼んであったオーブンが出来上がってきました。熱風を上からヒートガンで送って、上昇する熱風で竹を暖める、煙突タイプのオーブンです。

プレーニング・フォームやバインダーは自分で作れましたが、このオーブンは溶接等の理由で外注です。でもやっぱり餅は餅屋です。うまく作ってあります。

24 January 2008

Making a rod binder


I was driving around today to get these.


Hopefully, I will be able to make a rod binder using these parts.


今日は、午後からロッドバインダー用のパーツを探しに行きました。

4枚のワッシャーの様な物とスプリングは、古いミシンのパーツをリサイクルしました。バインディング時に糸のテンションを調節するのに使う予定です。ミシン屋のおやじさんに、「こんだけのパーツでいくら?」と聞いたところ、「暑いからビールが飲みたい」と言うので、ビール一杯分のお金を渡してきました。

3個のプーリーは、ドライブベルト用。スライディングドア用の滑車を流用しました。このどうでも良さそうな滑車が一個7ドルと結構な値段でした。ただ、色んな店を回ってみた結果、他に使えそうなパーツが無かったのでしょうがありません。でもバインダーの完成品を買うとなると200ドル以上はするので、まあ安い買い物でしょうか。


The sky was beautiful today

庭から見上げた今日の夕方の空です。


19 January 2008

Let's plane some bamboo


I began rough-planing today.


Heat straightening was fiddly and stressful.

Planing, on the other hand, is more therapeutic. I like the feel of a plane taking thin shavings on each stroke. It is rhythmical and much more like casting a line with a fly rod.

いよいよ荒削りを開始です。

一定のリズムで鉋をかけていると、なんだかフライキャスティングをしている様な気持ちになります。


17 January 2008

my new plane for rod making


My new plane just arrived yesterday.


This is my second block plane from Lie-Nielsen.

I've been using a low-angle plane (left on the picture) for general woodworking.

The plane on the right is a new high-anlge one that I bought for rod making. It has a grooved sole to work on the planing form.


View from the back.


The grooving on the sole of the high-angle plane

新しいブロックプレーンです。刃のアングルが低いローアングルの物は、以前から木工に使っていましたが、今回買ったのは刃が乗る台座の角度が高いタイプで、
竿作り用に底には溝も切ってあります


Straightening bamboo


I thought splitting was hard, straightening bamboo strips were even harder. I already broke two strips.

I think straightening requires patience and decisiveness, two important human characters which I often lack.


To heat strips up, I used an alcohol lamp first, but I soon felt it wasn't for me. It was very difficult for me to get a right temperature without strips being flamed up and carbonized like Captain Solo.


I then switched to a heat gun, and it worked better for me.

My heat gun is one made by Bosch. I bought it because it has a variable temp controller with a digital setting.
Unfortunately it didn't come with a flat nozzle, which is only available as an option with a price tag of $24. Instead, I went to see a local workshop fixing exhaust pipes. They made one for me on the spot for $10.


This fish-tail shape exhaust pipe reminds me of old BSA Bantam I used to have.


I am wonderling how "straight" each strip has to be before I can start rough planing.

Some people say the strips only need to be straight around nodes, while others say they need to be as straight as arrows.

Also, rod makers appear to have diffeent views on actual straightening techniques. One school says, "put in the vice and tighten as hard as you can", yet another argues not to put strips under too much pressure as they can be deformed, etc.

I guess this is an area where I need to get a feel of it, and find out what works best for me. This only comes with a lot practice, which means a lot of broken strips...


竹割りに続いて曲げ直しですが、いやー難しいです。ちょっと力を入れただけでポッキーンです。

ティップとバットと合わせて12本終えましたが、なんとなくどれだけ熱を加えれば良いかが見えてきました。

ところでこの曲げ直し、どれだけ真っすぐにしなくてはいけないのでしょうか?


13 January 2008

Splitting bamboo


"Like a bamboo split". It is a Japanese expression to describe people with straight and fair personalites.

After having my first experience of bamboo splitting, I now feel this old expression is bit misleading. I don't think bamoo splits straight that easily.


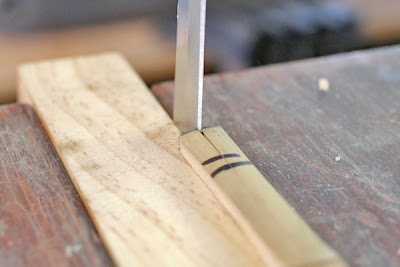
I've tried a few different methods to split bamboo, but so far, I feel "a knife in a vice" method is the easiest for me to get
4 to 6mm wide strips.

I chose a cheap kitchen knife (not a samurai sword) to use as a splitting knife. It has a 10 mm x 200 mm blade, and it is a long enough to use in a vice on my workbench. The thickness of the blade is about 3 mm.

I cut off the tip of the blade with a hacksaw, so it now has a square tip. I did this, so it won't stab me in case
if I slip. I also took off its cutting edge with an oil stone again for the same reason.

I put a piece of pine (40mm thick and 1500 mm long) in the vice to act as a table on which a bamboo strip can lay flat when I do splitting.


I have found out that it is a good idea to plane down the pith side of each strip to flatten nodes and other high areas. By doing this, the strip can stay flat on the table without rolling to left and rihgt as I split it.


EF 50mm f/2.5 macro

バットセクションの竹割りは無事終了。最初の何本かは、きれいに半分に割れずに片方に先細りになってしまいました。この問題は、ピス側の節とエッジを鉋で平にする事で解消しました。ただ、慣れた人ならナタ一本で5、6mmの幅に簡単に割れるのでしょうね。

それにしても、「竹を割った様な」と最初に言った人はロッドビルダーでは多分ないでしょう。